Create a Firewall Using the CLI
You can provide the --droplet-ids flag a list of Droplet IDs to automatically assign existing Droplets to a firewall during its creation. To retrieve a list of Droplets and their IDs, use the doctl compute droplet list command.
How to Create a Firewall Using the DigitalOcean CLI
- Install
doctl, the official DigitalOcean CLI.
- Create a personal access token and save it for use with
doctl.
- Use the token to grant
doctl access to your DigitalOcean account.
- Finally, run
doctl compute firewall create. Basic usage looks like this, but you can read the usage docs for more details:
doctl compute firewall create [flags]
example-firewall that contains an inbound rule and an outbound rule and applies them to the specified Droplets:
doctl compute firewall create --name "example-firewall" --inbound-rules "protocol:tcp,ports:22,droplet_id:386734086" --outbound-rules "protocol:tcp,ports:22,address:0.0.0.0/0" --droplet-ids "386734086,391669331" --tag-names "frontend,backend,k8s:f81d4fae-7dec-11d0-a765-00a0c91e6bf6"
Create a Firewall Using the API
You can provide the droplet_ids field with an array of Droplet IDs to automatically assign existing Droplets to a firewall during its creation. To retrieve a list of Droplets and their IDs, use the /v2/droplets endpoint.
How to Create a Firewall Using the DigitalOcean API
- Create a personal access token and save it for use with the API.
- Send a POST request to
https://api.digitalocean.com/v2/firewalls.
cURL
Using cURL:
curl -X POST \
  -H "Content-Type: application/json" \
  -H "Authorization: Bearer $DIGITALOCEAN_TOKEN" \
  -d '{"name":"firewall","inbound_rules":[{"protocol":"tcp","ports":"80","sources":{"load_balancer_uids": ["4de7ac8b-495b-4884-9a69-1050c6793cd6"]}},{"protocol": "tcp","ports": "22","sources":{"tags": ["gateway"],"addresses": ["18.0.0.0/8"]}}],"outbound_rules":[{"protocol":"tcp","ports":"80","destinations":{"addresses":["0.0.0.0/0","::/0"]}}],"droplet_ids":[8043964]}' \
  "https://api.digitalocean.com/v2/firewalls"
Go
Using Godo, the official DigitalOcean API client for Go:
import (
    "context"
    "os"

    "github.com/digitalocean/godo"
)

func main() {
    token := os.Getenv("DIGITALOCEAN_TOKEN")

    client := godo.NewFromToken(token)
    ctx := context.TODO()

    createRequest := &godo.FirewallRequest{
        Name: 'firewall',
        InboundRules: []godo.InboundRule{
            {
                Protocol: 'tcp',
                PortRange: '80',
                Sources: &godo.Sources{
                    LoadBalancerUIDs: []string{'4de7ac8b-495b-4884-9a69-1050c6793cd6'},
                },
            },
            {
                Protocol:  'tcp',
                PortRange: '22',
                Sources: &godo.Sources{
                    Addresses: []string{'18.0.0.0/8'},
                    Tags: []string{'gateway'},
                },
            },
        },
        OutboundRules: []godo.OutboundRule{
            {
                Protocol: 'tcp',
                PortRange: '80',
                Destinations: &godo.Destinations{
                    Addresses: []string{'0.0.0.0/0', '::/0'},
                },
            },
        },
        DropletIDs: []int{8043964},
    }

    firewall, req, err := client.Firewalls.Create(ctx, createRequest)
}
Ruby
Using DropletKit, the official DigitalOcean API client for Ruby:
require 'droplet_kit'
token = ENV['DIGITALOCEAN_TOKEN']
client = DropletKit::Client.new(access_token: token)

firewall = DropletKit::Firewall.new(
  name: 'firewall',
  inbound_rules: [
    DropletKit::FirewallInboundRule.new(
      protocol: 'tcp',
      ports: '80',
      sources: {
        load_balancer_uids: ['4de7ac8b-495b-4884-9a69-1050c6793cd6']
      }
    ),
    DropletKit::FirewallInboundRule.new(
      protocol: 'tcp',
      ports: '22',
      sources: {
        tags: ['gateway'],
        addresses: ['18.0.0.0/8']
      }
    )
  ],
  outbound_rules: [
    DropletKit::FirewallOutboundRule.new(
      protocol: 'tcp',
      ports: '80',
      destinations: {
        addresses: ['0.0.0.0/0', '::/0'],
      }
    )
  ],
  droplet_ids: [8043964]
)

client.firewalls.create(firewall)
Python
Using PyDo, the official DigitalOcean API client for Python:
import os
from pydo import Client

client = Client(token=os.environ.get("DIGITALOCEAN_TOKEN"))

req = {
  "name": "firewall",
  "inbound_rules": [
    {
      "protocol": "tcp",
      "ports": "80",
      "sources": {
        "load_balancer_uids": [
          "4de7ac8b-495b-4884-9a69-1050c6793cd6"
        ]
      }
    },
    {
      "protocol": "tcp",
      "ports": "22",
      "sources": {
        "tags": [
          "gateway"
        ],
        "addresses": [
          "18.0.0.0/8"
        ]
      }
    }
  ],
  "outbound_rules": [
    {
      "protocol": "tcp",
      "ports": "80",
      "destinations": {
        "addresses": [
          "0.0.0.0/0",
          "::/0"
        ]
      }
    }
  ],
  "droplet_ids": [
    8043964
  ]
}

resp = client.firewalls.create(body=req)
Create a Firewall Using the Control Panel
You can create a firewall at any time from the control panel by opening the Create menu in the upper-right and choosing Cloud Firewalls.

On the creation form, choose a name for your firewall in the Name field and then define at least one rule.
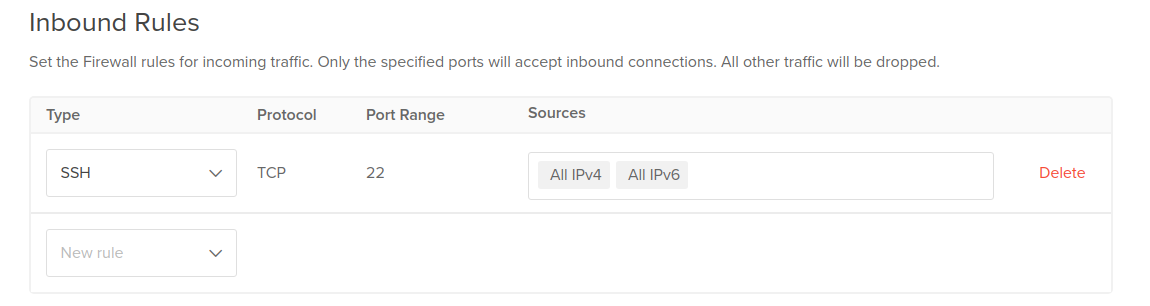
When you first create a cloud firewall, there are four inbound and outbound rules defined by default that allow some fundamental traffic. You can keep, modify, or delete these rules, and create new ones.
Default Inbound Rule: SSH
Because the compromise of a server typically begins over an inbound connection, the default inbound connections remain entirely restricted with one exception. The suggested rule allows SSH connections on port 22 from anywhere so that users can to administer the server from a terminal.
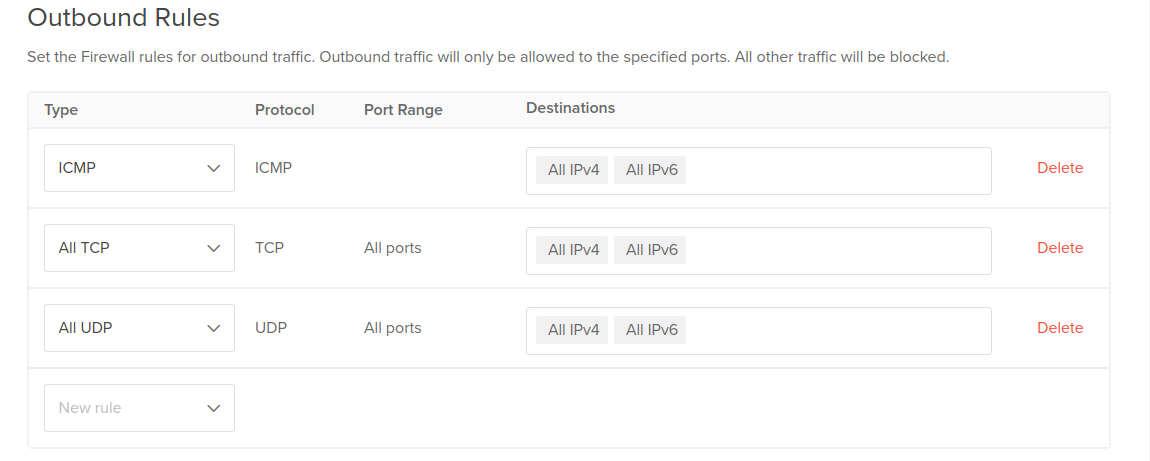
Default Outbound Rules: Permit All Traffic
Many fundamental services rely on outbound communication. Utilities like ping require outbound ICMP. DNS lookups, VoIP and NTP all rely on outbound UDP. Tasks like data synchronization, package list updates, web requests and email require outbound TCP connections.
Because of this, the suggested outbound rules permit all traffic to any destination on any port. These defaults make it easier to set up a new server without introducing restrictions that could block expected functionality.
Apply to Droplets
After configuring the firewall’s rules, apply the firewall to the Droplets you want to secure using the Apply to Droplets field. You can also leave this field blank and assign Droplets later.
In the Apply to Droplets field, type the name of a Droplet or resource tag into the field. A drop-down populates with a applicable resources. Choose Droplets by name, tag, or a combination of both. You can also search for Droplets by IP address.

There are limits on the number of Droplets and tags that can be added to a firewall, but there are no limits to the number of Droplets that can be associated with a tag. Using tags allows you to exceed the individual Droplet limit for firewalls. You can also tag a Droplet when you create it, which means you can apply firewall rules immediately.
Droplets can be protected by more than one cloud firewall. When they are, a union of the rules is applied. For example, if one rule allows TCP from any source and another allows TCP from a restricted range, the union of the two means that TCP traffic is allowed from anywhere.
Create the Firewall
Once you’ve defined the firewall’s rules and added Droplets to it, click Create Firewall.
After you’ve created a firewall, you can manage its rules and the resources that it protects from the Firewalls tab in the Networking section of the control panel.